# 預製太陽光電方案的線束配置優化

> Source: https://chinacableglands.com/zh-hant/blog/optimizing-wire-harnesses-for-prefabricated-solar-solutions/
> Language: zh-Hant
> Publisher: 倍拓電纜接頭
> Author: Edward Wang
> Published: 2026-03-18
> Updated: 2026-06-14

透過管制拓撲、長度、支撐點、連接器系統、外殼引入口及現場公差，優化預製太陽光電線束。

<p><strong>只有當工廠管制的介面符合實際陣列的幾何形狀與公差時，預製太陽光電線束才能發揮作用。</strong>我會先確認電氣連接、連接器識別及電纜結構，再界定長度、支撐、外殼引入口、極性標籤及允許的現場調整量。應確認每個端點都能接到，且沒有垂掛、摩擦、接觸銳邊、連接器受力或電纜被拉過接頭的情形。單靠縮短電纜或增加分支，無法優化列、追蹤器、屋頂或橇裝設備各不相同的配置。</p>
<blockquote>
<p><strong>重點整理</strong></p>
<ul>
<li>電路拓樸與連接器系統會先決定各介面，之後才最佳化電纜長度。</li>
<li>區分製成線束的尺寸與現場路徑所需的公差。</li>
<li>依已安裝陣列的幾何配置確定支撐位置，不套用通用間距規則。</li>
<li>每個外殼引入口都有電纜側與壁面側介面。</li>
<li>在具代表性的陣列區段，逐一檢查運輸、安裝、運轉及維修操作空間。</li>
</ul>
</blockquote>
<h2 id="define-the-prefabrication-boundary-before-drawing-the-harness">繪製線束前先界定預製範圍</h2>
<p>預製太陽光電線束是在場外組裝的線束，包含導體、端接、分支與長度，並依特定安裝需求設計。模組引線、獨立分支組件、主幹引線及監測線入口，可能來自不同供應商或在不同階段安裝，但其介面仍須相互符合。「即插即用」無法解決連接器不相容、密封件適用直徑不符、可達距離不足、重量未受支撐或出現預期外接續。</p>
<p>IEC 62548-1:2023 涵蓋太陽光電陣列設計，包括直流配線、保護、切換及接地；但沒有規定通用的線束配置。模組排列、轉換器架構、串列、極性與導體工作條件決定電路。保護、停機、設備引入口及維護空間則決定預製線束必須在哪些位置連接。</p>
<figure class="blog-chart" style="container-type: inline-size;">
<svg xmlns="http&#58;//www.w3.org/2000/svg" viewBox="0 0 760 1704.11" role="img" aria-labelledby="pv-harness-boundary-title pv-harness-boundary-desc" style="font-family:var(--font-body); width: 100% !important; max-width: 100% !important; height: auto !important;" id="cg-typography-d94f199253817fe7">
<style>
#cg-typography-d94f199253817fe7 { --svg-body-screen: 17px; }
@media (max-width: 760px) { #cg-typography-d94f199253817fe7 { --svg-body-screen: 16px; } }
</style>
<title id="pv-harness-boundary-title">預製太陽光電線束的管制界線</title>
<desc id="pv-harness-boundary-desc">五階段垂直流程圖分別呈現陣列輸入、工廠定義的線束、運輸狀態、現場管制的佈線公差，以及最終外殼引入口。</desc>
<defs>
<marker id="pv-harness-boundary-arrow" markerWidth="8" markerHeight="8" refX="7" refY="4" orient="auto">
<path d="M0 0L8 4L0 8Z" fill="var(--color-primary)"/>
</marker>
</defs>
<text x="380" y="42" text-anchor="middle" fill="var(--color-carbon)" font-size="24" font-weight="700" style="font-size: calc(22px * 760px / 100cqw) !important;"><tspan x="380" dy="0">區分工廠</tspan><tspan x="380" dy="55">固定的項目與現場調整的項目</tspan></text>
<rect x="48" y="133" width="664" height="240" rx="16" fill="var(--surface-card)" stroke="var(--color-cloud)" stroke-width="3"/>
<text x="82" y="173" fill="var(--color-primary)" font-size="20" font-weight="700" style="font-size: calc(18px * 760px / 100cqw) !important;">1 陣列及電路輸入</text>
<text x="82" y="211" fill="var(--color-carbon)" font-size="20" style="font-size: calc(var(--svg-body-screen) * 760px / 100cqw) !important;"><tspan x="82" dy="0">模組列、串列、極性</tspan><tspan x="82" dy="40">及設備節點。</tspan></text>
<text x="82" y="289" fill="var(--color-graphite)" font-size="18" style="font-size: calc(var(--svg-body-screen) * 760px / 100cqw) !important;"><tspan x="82" dy="0">電氣設計管制</tspan><tspan x="82" dy="40">所有後續介面。</tspan></text>
<path d="M380 373 V413" stroke="var(--color-primary)" stroke-width="4" marker-end="url(#pv-harness-boundary-arrow)"/>
<rect x="48" y="427" width="664" height="304.37" rx="16" fill="var(--color-ash)" stroke="var(--color-primary)" stroke-width="3"/>
<text x="82" y="467" fill="var(--color-primary)" font-size="20" font-weight="700" style="font-size: calc(18px * 760px / 100cqw) !important;">2 工廠定義的線束</text>
<text x="82" y="505" fill="var(--color-carbon)" font-size="20" style="font-size: calc(var(--svg-body-screen) * 760px / 100cqw) !important;"><tspan x="82" dy="0">電纜、接點、分支、</tspan><tspan x="82" dy="40">極性及分段長度。</tspan></text>
<text x="82" y="583" fill="var(--color-graphite)" font-size="18" style="font-size: calc(var(--svg-body-screen) * 760px / 100cqw) !important;"><tspan x="82" dy="0">管制工具、組裝</tspan><tspan x="82" dy="40">順序及介面識別。</tspan></text>
<text x="82" y="663.37" fill="var(--color-graphite)" font-size="18" style="font-size: calc(var(--svg-body-screen) * 760px / 100cqw) !important;"><tspan x="82" dy="0">將量得的路徑</tspan><tspan x="82" dy="40">公差分配至現場調整區。</tspan></text>
<path d="M380 731.37 V771.37" stroke="var(--color-primary)" stroke-width="4" marker-end="url(#pv-harness-boundary-arrow)"/>
<rect x="48" y="785.37" width="664" height="240" rx="16" fill="var(--surface-card)" stroke="var(--color-cloud)" stroke-width="3"/>
<text x="82" y="825.37" fill="var(--color-primary)" font-size="20" font-weight="700" style="font-size: calc(18px * 760px / 100cqw) !important;">3 運輸狀態</text>
<text x="82" y="863.37" fill="var(--color-carbon)" font-size="20" style="font-size: calc(var(--svg-body-screen) * 760px / 100cqw) !important;"><tspan x="82" dy="0">保護接點、密封件、彎曲</tspan><tspan x="82" dy="40">限值及識別標記。</tspan></text>
<text x="82" y="941.37" fill="var(--color-graphite)" font-size="18" style="font-size: calc(var(--svg-body-screen) * 760px / 100cqw) !important;"><tspan x="82" dy="0">運輸固定方式須維持</tspan><tspan x="82" dy="40">包裝狀態的電纜路徑。</tspan></text>
<path d="M380 1025.37 V1065.37" stroke="var(--color-primary)" stroke-width="4" marker-end="url(#pv-harness-boundary-arrow)"/>
<rect x="48" y="1079.37" width="664" height="304.37" rx="16" fill="var(--color-ash)" stroke="var(--color-primary)" stroke-width="3"/>
<text x="82" y="1119.37" fill="var(--color-primary)" font-size="20" font-weight="700" style="font-size: calc(18px * 760px / 100cqw) !important;">4 現場管制的路徑</text>
<text x="82" y="1157.37" fill="var(--color-carbon)" font-size="20" style="font-size: calc(var(--svg-body-screen) * 760px / 100cqw) !important;"><tspan x="82" dy="0">使用量得的公差調整</tspan><tspan x="82" dy="40">支撐、彎曲及移動空間。</tspan></text>
<text x="82" y="1235.37" fill="var(--color-graphite)" font-size="18" style="font-size: calc(var(--svg-body-screen) * 760px / 100cqw) !important;"><tspan x="82" dy="0">支撐點管制跨距、磨耗、</tspan><tspan x="82" dy="40">排水及連接器負荷。</tspan></text>
<text x="82" y="1315.74" fill="var(--color-graphite)" font-size="18" style="font-size: calc(var(--svg-body-screen) * 760px / 100cqw) !important;"><tspan x="82" dy="0">採用為該路徑</tspan><tspan x="82" dy="40">界定的調整方法。</tspan></text>
<path d="M380 1383.74 V1423.74" stroke="var(--color-primary)" stroke-width="4" marker-end="url(#pv-harness-boundary-arrow)"/>
<rect x="48" y="1437.74" width="664" height="154.37" rx="16" fill="var(--surface-card)" stroke="var(--color-primary)" stroke-width="3"/>
<text x="82" y="1477.74" fill="var(--color-primary)" font-size="20" font-weight="700" style="font-size: calc(18px * 760px / 100cqw) !important;">5 最終設備介面</text>
<text x="82" y="1518.11" fill="var(--color-carbon)" font-size="20" style="font-size: calc(var(--svg-body-screen) * 760px / 100cqw) !important;"><tspan x="82" dy="0">使連接器、電纜引入口</tspan><tspan x="82" dy="40">及外殼配置相匹配。</tspan></text>
<text x="380" y="1640.11" text-anchor="middle" fill="var(--color-carbon)" font-size="20" font-weight="700" style="font-size: calc(var(--svg-body-screen) * 760px / 100cqw) !important;"><tspan x="380" dy="0">預製可重複的</tspan><tspan x="380" dy="40">部分，其餘現場量測。</tspan></text>
</svg>
<figcaption>流程依序呈現陣列輸入、工廠固定的組裝資料、運輸防護、現場路徑公差及最終設備介面。</figcaption>
</figure>
<h2 id="size-segments-from-the-installed-array-route">依已安裝陣列路徑設定各段尺寸</h2>
<p>各段尺寸應沿實際安裝路徑確定，而不是量測圖面符號間的直線距離。模組列、追蹤器區段、模組區塊、屋頂區域或滑橇介面可能重複，但連接器出口、支撐點、彎曲、交越、活動接點及設備接近位置仍需預留空間。還須納入模組位置、結構孔位、追蹤器移動、外殼位置、電纜及連接器尾端的變動，並包含配接與維修操作空間。</p>
<p><strong>功能長度</strong>依預定路徑量取。 <strong>安裝餘量</strong>為配接、工具操作、佈線變化及電纜彎曲限值增加有界長度。 <strong>移動餘量</strong>適用於明確界定的移動範圍。我會分開記錄這些餘量，而非一律加上通用百分比。電纜過長可能垂落、積水或被盤成過緊的線圈；過短則會使接點、密封件、支撐或引入口受力。</p>
<p><a class="article-tool-card article-tool-card-link" href="/zh-hant/resource-center/tools/cable-bend-radius-calculator/" aria-label="電纜彎曲半徑計算器"><span class="article-tool-card-index">工具</span><span class="article-tool-card-kicker">電纜尺寸</span><strong class="article-tool-card-title">電纜彎曲半徑計算器</strong><span class="article-tool-card-copy">輸入實際電纜外徑，以及電纜製造商或適用安裝規定所列的彎曲係數，計算各線束分段所需的最小半徑。</span><span class="article-tool-card-formula">Rmin = F × OD; Dbend = 2 × Rmin</span><span class="article-tool-card-inputs" aria-label="計算器輸入項目"><em>電纜外徑</em><em>指定彎曲係數</em><em>引入口後直線段預留長度</em></span><span class="article-tool-card-action">開啟計算器 <span aria-hidden="true">-&gt;</span></span></a></p><p>在各分段及引入口處預留彎曲空間。我會依移動情形、支撐、連接器與密封區域，以及現場幾何形狀，在既定電氣拓撲內規劃路徑。</p>
<p>這些路徑特徵決定各段必須如何配置：</p>
<table>
<thead>
<tr>
<th>路徑特徵</th>
<th>影響原因</th>
<th>實際安裝須符合的項目</th>
</tr>
</thead>
<tbody>
<tr>
<td>端點</td>
<td>避免外觀相近的引線互換</td>
<td>設備與極性節點</td>
</tr>
<tr>
<td>完成後路徑長度</td>
<td>沿實際路徑到達預定連接點</td>
<td>已安裝的幾何配置與公差</td>
</tr>
<tr>
<td>第一及最後支撐點</td>
<td>避免電纜重量施加於端接處</td>
<td>結構、線夾及允許負載</td>
</tr>
<tr>
<td>彎曲與轉向</td>
<td>避免連接器或電纜密封接頭處出現受迫彎折</td>
<td>依電纜規格訂定的彎曲限制</td>
</tr>
<tr>
<td>移動區</td>
<td>避免移動機構拉扯線束</td>
<td>追蹤器或設備的行程</td>
</tr>
<tr>
<td>現場調整</td>
<td>避免非計畫中的剪切或接續</td>
<td>允許的方法及剩餘長度範圍</td>
</tr>
</tbody>
</table>
<p>美國能源部的太陽光電直流串列電纜管理指引，將電纜長度、成束方式、彎曲限值、連接器、絕緣及支撐相互連結。該指引說明佈線時應避開銳邊、磨耗、活動零件及過度曝曬於直射陽光。我會先將這些原則用於完整路徑，再選擇各支撐點。</p>
<h2 id="match-topology-and-connectors-before-branch-lengths">先確認拓樸與連接器，再確定分支長度</h2>
<p>先界定電氣拓撲，再設計線束幾何形狀。拓撲是指電路的連接配置。我會識別串聯模組、並聯串列、電流匯集點、隔離、過電流保護及轉換器輸入端。正極及負極路徑分開繪製，並標出每個連接器、分支、轉換處、引入口、端子及未使用端口。線束無法修正錯誤串列、極性反接或合併電流路徑過載。</p>
<p>IEC 62852:2014 涵蓋其電壓／電流範圍內的太陽光電直流連接器及安全測試；外殼相似不代表可以互換。應採用已識別的系統，並配用指定的正、負極外殼、接點、密封件、電纜範圍、允許的配對組合與工具。<a href="/zh-hant/blog/a-complete-guide-to-mc4-branch-connectors-y-connectors-for-parallel-strings/">太陽光電並聯分支連接器指南</a>說明合併電流與反向電流、保護及配接；分支設計必須先處理這些項目，才能確定線長。</p>
<p>電纜尺寸或連接器系列變更時，應視為經設計的轉換。我會確保該處可供接近，並核對兩側的導體材料與截面積、絕緣、外徑、溫度、路徑、接點、密封件及設備限值。「相容 MC4」或手動試配均無法證明所需的連接器識別。</p>
<h2 id="design-support-slack-and-movement-for-the-solar-location">依太陽光電安裝地點設計支撐、餘長及移動空間</h2>
<p>在運轉期間，支撐必須避免負荷傳至接點、密封件及引入口。我會繪出重力、風力、追蹤器及熱移動、相關積雪或結冰、搬運及運輸固定方式。電纜應避開邊緣、磨耗、活動零件、熱源、積水及超出其限值的曝露。即使工廠線束整齊，若現場支撐不當，端接處仍可能受力。</p>
<p>對固定式支架，我會檢查允許範圍內最不利的結構公差及安裝位置。對追蹤器，則追蹤完整行程及樞軸與設備處彎曲情形的變化。餘長應能移動且不受夾壓或摩擦。屋頂路徑也須考量排水、磨耗防護、維修可及性，以及轉接至現場配線管槽或外殼的明確方式。依電纜及支撐資料設計，不套用通用間距或環圈長度。</p>
<p>大型且緊密的線束須進行電氣及熱評估。成束會改變熱傳，也可能妨礙標籤識讀、更換及排水。維持電路分隔，並讓連接器避開夾壓區。每個維修預留環圈都應有明確用途及安全的移動空間。</p>
<h2 id="treat-every-enclosure-entry-as-two-matched-interfaces">將每個外殼引入口視為兩個相互匹配的介面</h2>
<p>在電纜側，電纜密封接頭會密封並固定選定的電纜；其直徑範圍、形狀、護套、接觸表面及鎧裝或屏蔽要求都很重要。在壁面側，螺紋或孔洞、厚度、承座面、墊圈、鎖緊螺帽、轉接頭、方向、間隙及組裝方式決定另一個介面。兩側都必須符合實際線束與外殼。</p>
<p>IEC 62444:2010 涵蓋按供應狀態交付的完整電纜密封接頭。我會依產品文件，核對完整產品、電纜範圍及壁面配置。<a href="/zh-hant/blog/which-cable-glands-are-best-for-solar-power-plant-installations/">太陽能電纜密封接頭選型指南</a>整合天候、電纜結構、材料及引入口證據。請使用<a href="/zh-hant/blog/what-is-cable-gland-clamping-range-and-why-does-it-matter-for-your-installation/">電纜夾持範圍指南</a>確認完整製造公差區間。</p>
<p>在引入口處，預留第一個外部支撐點與內側彎曲空間。除非電纜密封接頭的設計已涵蓋，否則電纜重量與安裝拉力不得作用於其密封部位。電纜密封接頭、太陽光電連接器、導管配件、穿板接頭及線組，即使安裝形式相似，其電氣、固定及密封功能仍各不相同。</p>
<figure class="blog-chart" style="container-type: inline-size;">
<svg id="solar-harness-entry-interface-svg" xmlns="http://www.w3.org/2000/svg" viewBox="0 0 480 1535" role="img" aria-labelledby="solar-harness-entry-interface-title solar-harness-entry-interface-desc" style="width:100%;height:auto;font-family:var(--font-body); width: 100% !important; max-width: 100% !important; height: auto !important;">
<style>
#solar-harness-entry-interface-svg { --svg-body-screen: 17px; }
@media (max-width: 760px) { #solar-harness-entry-interface-svg { --svg-body-screen: 16px; } }
</style>
<title id="solar-harness-entry-interface-title">預製太陽光電線束外殼引入口的兩個匹配介面</title><desc id="solar-harness-entry-interface-desc">狹長的垂直剖面圖將電纜密封與固定介面，和外殼安裝層疊分開呈現，並標示第一個外部支撐、內部彎曲處及端子避讓範圍。</desc>
<style>#solar-harness-entry-interface-svg{--bg:#f4f7f5;--card:#fff;--ink:#142820;--muted:#455a52;--line:#536861;--soft:#d8dfdc;--part:#c7d0cc;--cable:#263f36;--accent:#16805d;--accent-dark:#0e6045;--accent-soft:#dceee7;--metal:#d6b86a;--metal-line:#8b743e}:root[data-theme="dark"] #solar-harness-entry-interface-svg{--bg:#101714;--card:#19231f;--ink:#f0f6f3;--muted:#c1cec8;--line:#93a69e;--soft:#34433d;--part:#52635c;--cable:#cbd7d2;--accent:#42c999;--accent-dark:#a4f2d5;--accent-soft:#1d3b31;--metal:#806d3f;--metal-line:#d7ba70}#solar-harness-entry-interface-svg .bg{fill:var(--bg)}#solar-harness-entry-interface-svg .card{fill:var(--card);stroke:var(--line);stroke-width:2}#solar-harness-entry-interface-svg .ink{fill:var(--ink)}#solar-harness-entry-interface-svg .muted{fill:var(--muted)}#solar-harness-entry-interface-svg .part{fill:var(--part);stroke:var(--line)}#solar-harness-entry-interface-svg .soft{fill:var(--soft);stroke:var(--line)}#solar-harness-entry-interface-svg .seal{fill:var(--accent);stroke:var(--accent-dark)}#solar-harness-entry-interface-svg .callout{fill:var(--accent-soft);stroke:var(--accent)}#solar-harness-entry-interface-svg .metal{fill:var(--metal);stroke:var(--metal-line)}</style>
<rect class="bg" width="480" height="1535" y="0"/><text class="ink" x="24" y="42" font-size="24" font-weight="700" style="font-size: calc(22px * 480px / 100cqw) !important;">兩個匹配的引入口介面</text><text class="muted" x="24" y="72" font-size="18" style="font-size: calc(var(--svg-body-screen) * 480px / 100cqw) !important;"><tspan x="24" dy="0">支撐點承受佈線負荷，</tspan><tspan x="24" dy="25">而不使密封功能承受該負荷。</tspan></text>
<g transform="translate(20 98)"><rect class="card" width="440" height="164" rx="16" style="stroke:var(--accent)" y="25"/><text x="24" y="63" fill="var(--accent-dark)" font-size="19" font-weight="700" style="font-size: calc(18px * 480px / 100cqw) !important;">1 · 電纜側介面</text><text class="ink" x="24" y="99" font-size="20" font-weight="700" style="font-size: calc(18px * 480px / 100cqw) !important;">密封區＋固定</text><text class="muted" x="24" y="133" font-size="18" style="font-size: calc(var(--svg-body-screen) * 480px / 100cqw) !important;">使成品電纜外徑、外形、</text><text class="muted" x="24" y="161" font-size="18" style="font-size: calc(var(--svg-body-screen) * 480px / 100cqw) !important;">護套、密封件及封閉方式相匹配。</text></g>
<g transform="translate(20 282)"><rect class="card" width="440" height="192" rx="16" y="25"/><text class="ink" x="24" y="63" font-size="19" font-weight="700" style="font-size: calc(18px * 480px / 100cqw) !important;">2 · 外殼側介面</text><text class="ink" x="24" y="99" font-size="20" font-weight="700" style="font-size: calc(18px * 480px / 100cqw) !important;">引入口＋密封件＋固定件</text><text class="muted" x="24" y="133" font-size="18" style="font-size: calc(var(--svg-body-screen) * 480px / 100cqw) !important;">使螺紋或開孔、面板承靠面、</text><text class="muted" x="24" y="161" font-size="18" style="font-size: calc(var(--svg-body-screen) * 480px / 100cqw) !important;">壁面層疊、配件及可及性相匹配。</text><text class="muted" x="24" y="189" font-size="18" style="font-size: calc(var(--svg-body-screen) * 480px / 100cqw) !important;">遵循確切的安裝說明。</text></g>
<g transform="translate(20 502)"><rect class="card" width="440" height="740" rx="18" y="25"/><text class="muted" x="24" y="63" font-size="18" font-weight="700" style="font-size: calc(18px * 480px / 100cqw) !important;">外部路徑</text><text class="muted" x="416" y="739" text-anchor="end" font-size="18" font-weight="700" style="font-size: calc(18px * 480px / 100cqw) !important;">外殼內部</text><path d="M56 151 H190" stroke="var(--cable)" stroke-width="24" stroke-linecap="round"/><rect class="metal" x="72" y="129" width="66" height="44" rx="14" stroke-width="3"/><path d="M105 173 V231" stroke="var(--metal-line)" stroke-width="8"/><rect class="soft" x="50" y="227" width="110" height="28" rx="10" stroke-width="3"/><text class="ink" x="105" y="291" text-anchor="middle" font-size="18" font-weight="700" style="font-size: calc(16px * 480px / 100cqw) !important;">第一個外部</text><text class="ink" x="105" y="318" text-anchor="middle" font-size="18" font-weight="700" style="font-size: calc(16px * 480px / 100cqw) !important;">支撐點</text><path class="part" d="M166 107 H292 L326 129 V173 L292 195 H166 Z" stroke-width="3"/><rect class="seal" x="196" y="119" width="36" height="64" rx="8" stroke-width="2"/><rect x="242" y="119" width="34" height="64" rx="8" fill="var(--soft)" stroke="var(--line)" stroke-width="2"/><text x="214" y="91" text-anchor="middle" fill="var(--accent-dark)" font-size="18" font-weight="700" style="font-size: calc(16px * 480px / 100cqw) !important;">電纜密封件</text><text class="muted" x="260" y="221" text-anchor="middle" font-size="18" font-weight="700" style="font-size: calc(16px * 480px / 100cqw) !important;">固定</text><rect class="soft" x="190" y="375" width="100" height="210" rx="7" stroke-width="3"/><rect x="190" y="441" width="100" height="76" fill="var(--bg)" stroke="var(--line)" stroke-width="3"/><rect class="seal" x="166" y="427" width="24" height="104" rx="7" stroke-width="2"/><path class="part" d="M122 435 H166 V523 H122 Z" stroke-width="3"/><path class="metal" d="M290 437 L368 455 V507 L290 525 Z" stroke-width="3"/><text class="ink" x="240" y="357" text-anchor="middle" font-size="18" font-weight="700" style="font-size: calc(16px * 480px / 100cqw) !important;">外殼壁面</text><text x="118" y="563" text-anchor="middle" fill="var(--accent-dark)" font-size="18" font-weight="700" style="font-size: calc(16px * 480px / 100cqw) !important;">引入口密封件</text><text x="338" y="563" text-anchor="middle" fill="var(--metal-line)" font-size="18" font-weight="700" style="font-size: calc(16px * 480px / 100cqw) !important;">固定件</text><text class="muted" x="240" y="613" text-anchor="middle" font-size="18" style="font-size: calc(16px * 480px / 100cqw) !important;">螺紋或開孔</text><path d="M326 481 H356 Q398 481 398 525 V585" fill="none" stroke="var(--cable)" stroke-width="24" stroke-linecap="round"/><rect x="302" y="635" width="114" height="82" rx="14" fill="var(--accent-soft)" stroke="var(--accent)" stroke-width="2" stroke-dasharray="9 7"/><text x="359" y="668" text-anchor="middle" fill="var(--accent-dark)" font-size="18" font-weight="700" style="font-size: calc(16px * 480px / 100cqw) !important;">端子</text><text x="359" y="697" text-anchor="middle" fill="var(--accent-dark)" font-size="18" font-weight="700" style="font-size: calc(16px * 480px / 100cqw) !important;">避讓</text><text class="ink" x="210" y="663" text-anchor="middle" font-size="18" font-weight="700" style="font-size: calc(18px * 480px / 100cqw) !important;">第一個內部</text><text class="ink" x="210" y="691" text-anchor="middle" font-size="18" font-weight="700" style="font-size: calc(16px * 480px / 100cqw) !important;">彎曲處</text></g>
<rect class="callout" x="20" y="1295" width="440" height="202" rx="18" stroke-width="2"/><text x="240" y="1335" text-anchor="middle" fill="var(--accent-dark)" font-size="19" font-weight="700" style="font-size: calc(18px * 480px / 100cqw) !important;">在圖面標示三項佈線管制</text><text class="ink" x="40" y="1377" font-size="18" style="font-size: calc(var(--svg-body-screen) * 480px / 100cqw) !important;">• 第一個外部支撐點</text><text class="ink" x="40" y="1415" font-size="18" style="font-size: calc(var(--svg-body-screen) * 480px / 100cqw) !important;">• 第一個受保護的內部彎曲處</text><text class="ink" x="40" y="1453" font-size="18" style="font-size: calc(var(--svg-body-screen) * 480px / 100cqw) !important;">• 端子避讓範圍</text><text class="muted" x="40" y="1483" font-size="18" style="font-size: calc(var(--svg-body-screen) * 480px / 100cqw) !important;">避免佈線負荷傳至兩個密封介面。</text>
</svg>
<figcaption>電纜側管制密封接觸及固定；外殼側管制螺紋或開孔、面板密封、配件及安裝間隙，佈線負荷則由相鄰支撐點承受。</figcaption>
</figure>
<h2 id="check-the-route-on-a-representative-jig">在具代表性的治具上檢查路徑</h2>
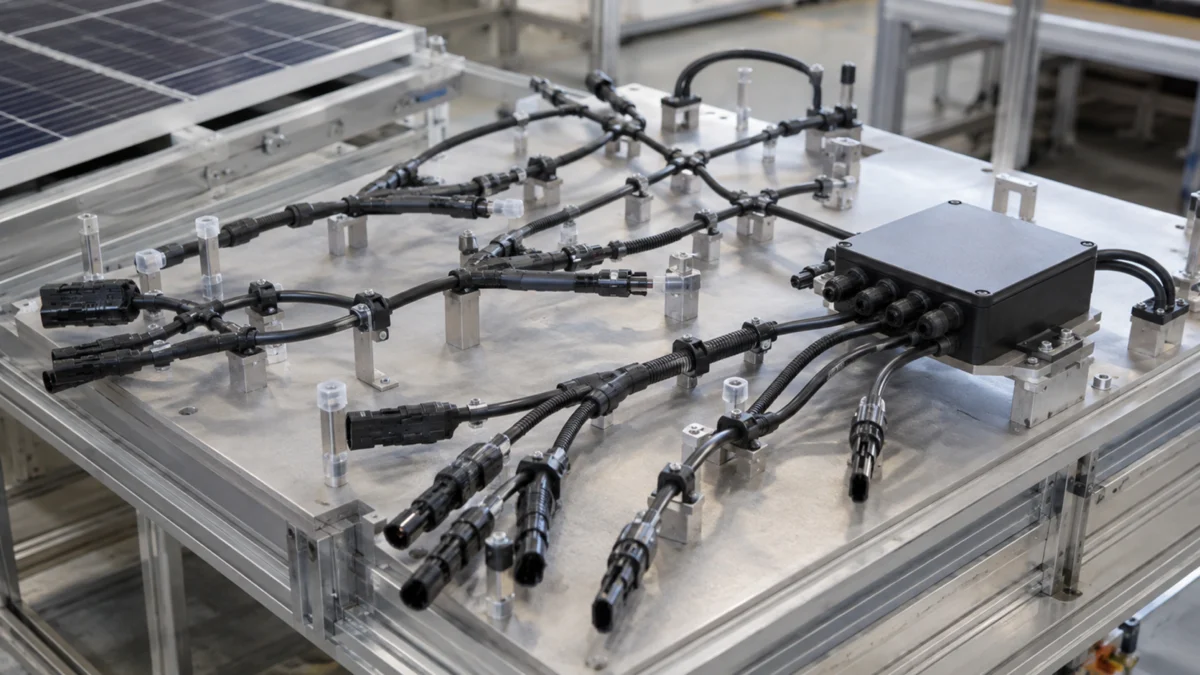
<p>治具應重現介面及佈線路徑。我會標示連接器基準點、設備引入口、分支、支撐、彎曲、極性及調整區域。使用量產電纜、接點、密封件、工具及組裝順序。對三維路徑，應重現高度、扭轉及接近角度。平板治具上的配合結果，仍可能未呈現朝後的引線，或使匯流設備引入口承受側向負荷。</p>
<figure>
<img alt="預製太陽光電線束排列在設有連接器、支撐及外殼引入口位置的三維組裝治具上" src="/images/blog/optimizing-wire-harnesses-for-prefabricated-solar-solutions/prefabricated-solar-harness-jig.webp" srcset="/images/blog/optimizing-wire-harnesses-for-prefabricated-solar-solutions/prefabricated-solar-harness-jig-800.webp 800w, /images/blog/optimizing-wire-harnesses-for-prefabricated-solar-solutions/prefabricated-solar-harness-jig.webp 1200w" sizes="(max-width: 680px) 100vw, 760px" width="1200" height="675" loading="lazy" decoding="async">
<figcaption>三維治具依太陽能模組邊緣定位分支點、配對連接器、支撐點、佈線彎曲處及多引入口外殼。</figcaption>
</figure>
<p>以穩定的基準點量測各段。總長可能掩蓋分支位置偏差，或餘長落在錯誤區域。須明確規定分段長度、分支引出位置、方向及公差的量測條件，因為拉直狀態、盤繞記憶效應、溫度與連接器基準點均可能改變讀值。</p>
<p>以不損壞彎曲部、接點、密封件或鎖扣的方式佈置、量測與包裝線束。標籤須能承受運輸與安裝，不得困住水氣、磨損電纜、因紫外線而劣化或妨礙零件。使用時須能辨識電路、極性、目的地及版本；僅憑連接器顏色不足以識別。防塵蓋與包裝須配合預定的配接順序。</p>
<h2 id="check-connections-geometry-and-transport-separately">分別檢查連接、幾何配置與運輸</h2>
<p>成品線束必須使用指定的電纜、連接器組件與引入口零件，且現場調整須在允許範圍內。導通測試無法確認分支位置或外殼接近路徑；尺寸吻合也無法確認極性或連接器相容性。電氣、尺寸、外觀及包裝檢查，分別回答同一組裝件的不同問題。</p>
<p>這些檢查可揭示預製組裝件中的不同問題：</p>
<table>
<thead>
<tr>
<th>檢查項目</th>
<th>檢查內容</th>
<th>須修正的問題</th>
</tr>
</thead>
<tbody>
<tr>
<td>連接器端部</td>
<td>正／負極外殼、接點、密封件、鎖扣、防塵蓋及目的地標籤是否正確</td>
<td>系統混用、鎖扣受損、密封件缺失或極性不明</td>
</tr>
<tr>
<td>分支與長度</td>
<td>基準點間長度、分支引出位置、方向與量測狀態</td>
<td>在代表性治具上的幾何配置與預定路徑不符</td>
</tr>
<tr>
<td>電纜與支撐</td>
<td>護套狀況、彎曲包絡、支撐位置及允許的調整方式</td>
<td>線夾、束帶或盤繞使電纜超出路徑包絡範圍</td>
</tr>
<tr>
<td>外殼引入口</td>
<td>電纜外徑範圍、電纜密封接頭、安裝堆疊、第一個支撐點及內側間隙</td>
<td>電纜或壁面介面與有文件佐證的組裝配置不符</td>
</tr>
<tr>
<td>運輸</td>
<td>盤繞直徑、固定方式、連接器保護、可見標籤及拆包順序</td>
<td>包裝負載施加於接點、密封件、彎曲處或分支接合處</td>
</tr>
</tbody>
</table>
<p>採用允許的修理或返工方法。更換接點、密封件、外殼、標籤、支撐件或電纜，可能改變尺寸、配接、防護能力或零件識別，因此應重新檢查受影響的功能。拉伸至基準點、旋轉固定分支、鬆開引入口或把多餘電纜藏起來，都無法解決路徑不符。重複組裝前，先修正根本的尺寸或組裝方法。</p>
<h2 id="check-fit-on-a-representative-solar-bay">在具代表性的太陽能陣列區段檢查安裝配合</h2>
<p>選一處具代表性的陣列區段、屋頂區域或滑橇，先實裝線束，再重複採用該設計。使用結構、模組、外殼及電纜公差的允許極限，並依指定順序、工具及操作空間進行檢查。確認極性、電路識別、配接、鎖扣、支撐、彎曲、移動、磨耗、排水、引入口就位及維修空間；如適用，還應涵蓋完整規定行程。</p>
<p>除了初始配合，還要檢查運輸固定、拆包、安裝搬運、追蹤器行程、設備開啟及允許的更換作業。環境條件可能改變電纜剛性或支撐負載。現場調整須限於允許的方法與範圍。若路徑需要解除固定、扭轉連接器、把電纜從電纜密封接頭中拉過、藏起盤圈或新增預期外接續，就應修正路徑。</p>
<p>電氣檢查應遵循專案及安全作業程序，可包括極性、導通、絕緣、連接電阻或其他規定值。除非裝置及方法明確允許，否則我不會在帶負載時分離太陽光電連接器。依規定測試確認接點及電路協調，再分別檢查支撐、排水及引入口配合。</p>
<h2 id="keep-replacement-paths-compatible-with-the-installed-geometry">使更換路徑符合已安裝幾何形狀</h2>
<p>我會在線束設計中規劃維修可及性。界定可更換分段、隔離、接近方式、所需連接器及電纜，以及如何恢復已驗證的路徑。避免把轉換處藏在必須裁切或拆除結構才能更換的位置。新增連接器須有明確的電氣、環境、機械及安裝功能，不能只為方便而增加。</p>
<p>幾何形狀或電路工況不同時，應採用不同型別。短、中、長等選項須對應已知區段或公差範圍，並清楚識別。我會將允許的調整界定為在區域內佈線、選擇不同型別，或執行明定端接。未受控的延長、不同配對混用、過緊線圈及額外接頭，都會使組裝偏離已驗證配置。</p>
<h2 id="conclusion">結論</h2>
<p>我會固定可重複的介面，並量測會變動的幾何形狀，以此進行優化。先處理電氣拓撲及連接器識別，再界定長度、支撐、移動區、引入口、標籤及調整方式，讓線束能接至設備而不使連接處受力或受損。</p>
<p>在相關公差極限及預定組裝順序下檢查具代表性的陣列區段。若路徑只有透過拉伸、盤繞、扭轉、解除固定或臨時拼湊端接才能成立，應先修正線束尺寸，再將此配置重複用於整個陣列。</p>
<h2 id="faqs-about-prefabricated-solar-wire-harnesses">預製太陽光電線束常見問題</h2>
<h3 id="should-every-solar-cable-be-included-in-one-prefabricated-harness">是否應將每條太陽光電電纜都納入同一條預製線束？</h3>
<p>不應如此。只將其拓撲、介面、路徑及安裝責任可作為同一組裝件管制的導體納入線束。模組引線、分支組件、主幹電纜、監測電纜、接地導體及設備尾線，可能涉及不同供應商、規則及現場公差。應明確界定各自範圍。</p>
<h3 id="how-much-extra-cable-should-a-prefabricated-solar-harness-include">預製太陽光電線束應預留多少額外電纜？</h3>
<p>沒有通用的餘量百分比或環圈長度。我會依實際公差、配接可及性、彎曲、移動及維修需求，增加有界的長度。檢查合理的最短及最長路徑。多餘電纜仍須有支撐、識別、足夠散熱，並避開磨耗、積水及夾壓區。</p>
<h3 id="can-visually-compatible-pv-connectors-be-mixed-in-a-factory-harness">外觀相容的太陽光電連接器可以在工廠線束中混用嗎？</h3>
<p>不可只憑外觀、名目接腳尺寸或相容性標籤混用。應使用相同識別的連接器系統及核准配對方式，除非現行證據明確列出兩側連接器、接點、密封件、電纜、工具、額定值及允許的配對組合。</p>
<h3 id="where-should-the-first-cable-support-be-placed-after-a-cable-gland">電纜密封接頭後方的第一個電纜支撐點應設在哪裡？</h3>
<p>依實際電纜重量、路徑、彎曲要求、移動情形、外殼幾何、接頭功能及支撐資料決定位置。支撐的目的是避免非預期的拉力、彎曲及扭轉傳至引入口。不同電纜、接頭、壁面及太陽能配置不會共用單一適用距離。</p>
<h3 id="what-is-the-best-first-article-check-for-a-prefabricated-solar-harness">預製太陽光電線束的首件最佳檢查方式為何？</h3>
<p>使用允許的公差極限與預定順序，在陣列區段安裝具代表性的線束。檢查電氣識別、極性、連接器配對、支撐、彎曲、移動、磨耗、排水、引入口及維修空間。實際安裝的區段必須重現預定路徑，也須通過平面治具檢查。</p>
<h3 id="sources-and-technical-references">資料來源與技術參考</h3>
<ul>
<li><a href="https://www.energy.gov/cmei/femp/solar-photovoltaic-cable-management-best-practices-dc-string-cables">美國能源部，《太陽光電電纜管理：直流串列電纜最佳實務》</a>，查閱日期：2026-09-09。</li>
<li><a href="https://webstore.iec.ch/en/publication/64171">IEC 62548-1:2023，太陽光電陣列—設計要求</a>，查閱日期：2026-09-09。</li>
<li><a href="https://webstore.iec.ch/en/publication/7463">IEC 62852:2014，太陽光電系統直流用連接器</a>，查閱日期：2026-09-09。</li>
<li><a href="https://webstore.iec.ch/en/publication/7034">IEC 62444:2010，電氣裝置用電纜密封接頭</a>，查閱日期：2026-09-09。</li>
</ul>
